The Ultimate Guide to Over Under Lacing

Author: Andy Hong | Founder at XDS
Hi, I'm Andy Hong, here to share my expertise in footwear manufacturing with you.
The Ultimate Guide to Over Under Lacing
Table of Contents
Ever buy a great pair of shoes, only to find they don’t feel quite right? Maybe they pinch at the top, or the laces keep loosening no matter how tight you pull them. I’ve been there—more times than I’d like to admit. I used to think the problem was the shoe itself. Turns out, the way you lace them makes all the difference.
I’ve spent years testing different lacing techniques, working with shoes for everything from running to formal wear. Over Under Lacing? It’s a game changer. It tightens evenly, reduces pressure points, and keeps laces from slipping.
In this article, I’ll show you exactly how to do it—step by step. Whether you need better comfort, a snug fit, or a clean, stylish look, you’ll have the right technique by the end of this guide.
So let’s get started!
1. How Over Under Lacing Works
Ever had trouble tightening your laces evenly? Or felt like they just wouldn’t stay in place? I’ve been there. That’s where Over Under Lacing comes in.
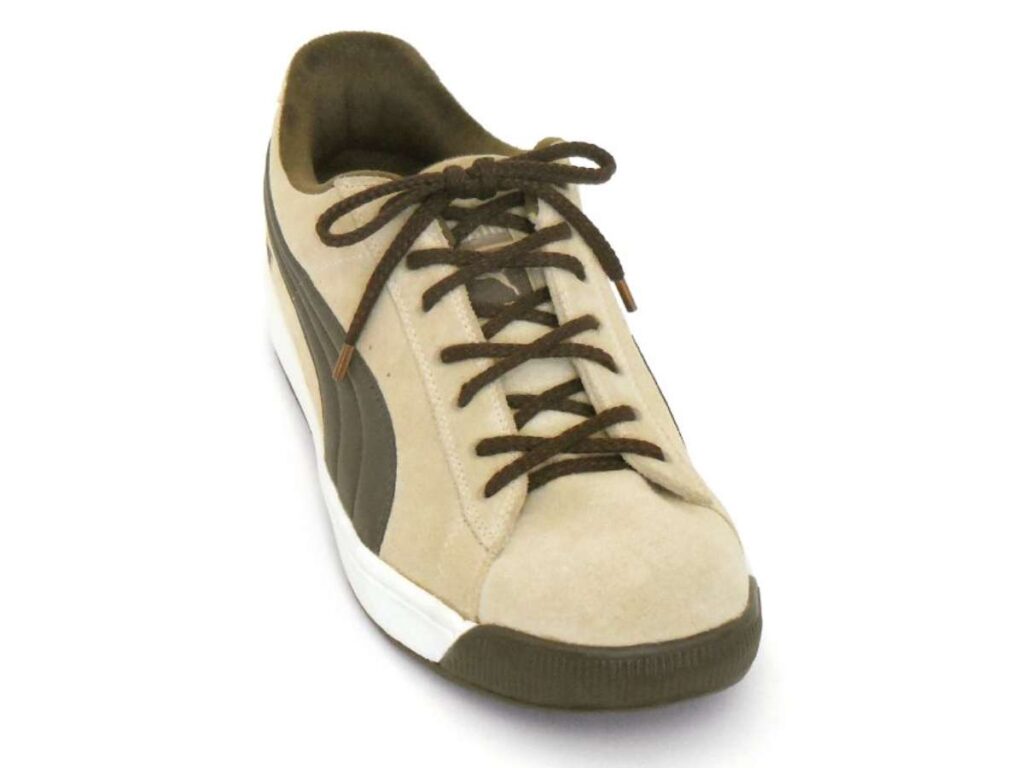
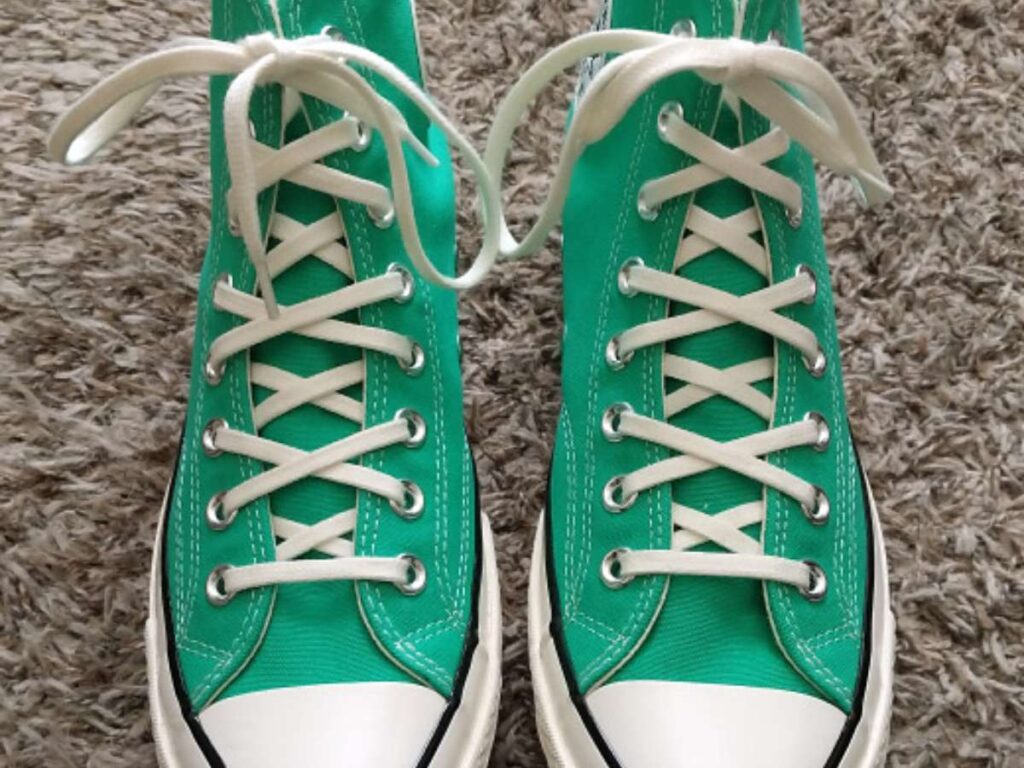
This method follows a simple pattern:
- One lace crosses over the other.
- The next pass goes under instead.
- Repeat all the way up the shoe.
It might sound small, but this change makes a big difference.

Why It Works
Most standard lacing methods, like crisscross lacing, stack each crossover on top of the previous one. That creates friction. The more friction, the harder it is to pull laces tight.
Over Under Lacing breaks that cycle. By alternating between over and under, there’s less friction between the laces. The result?
- Easier tightening
- A more secure hold
- Less wear on the laces
I first tried this on my running shoes. It felt like magic—smooth, even tension from top to bottom. No tugging, no uneven pressure points.
If you’ve struggled with laces slipping or feeling too tight in certain spots, this method might be the fix you’ve been looking for. Ready to try it out? Let’s dive into the steps.
2. Step-by-Step Lacing Technique
Let’s get your shoes laced up the right way. Over Under Lacing might seem tricky at first, but once you get the rhythm, it’s easy. Follow these steps, and you’ll have a snug, even fit in no time.
Step 1: Starting the Laces
- Even number of eyelet pairs: Start by threading the lace straight across the outside and in through the bottom eyelets.
- Odd number of eyelet pairs: Start by threading the lace straight across the inside and out through the bottom eyelets.
Step 2: The Over Under Pattern
Cross Over: Take one lace and cross it over the top. Feed it down through the next eyelet.
Cross Under: Now, take the other lace and cross it under (inside the shoe). Feed it up and out through the next eyelet.
Repeat this pattern until you reach the top.
Step 3: Finishing Up
Once you reach the last set of eyelets, tie your laces as usual. You should note:
- A smoother pull when tightening
- A more even fit with less pressure on the top of your foot
- Laces that stay in place longer
I remember switching to this method on a new pair of sneakers. The difference was instant. No more adjusting my laces every few hours. It just felt right.
3. Features of Over Under Lacing
I used to lace my shoes the same way every time—basic crisscross, pull tight, and done. It worked, but I always had small annoyances: laces wearing out too fast, uneven pressure, and shoes that never felt quite right. Then I found Over Under Lacing.
It wasn’t just about function. It changed how my shoes looked, felt, and lasted. Let’s break down why this method stands out.
A Clean, Stylish Look
Ever see a pair of perfectly laced sneakers and wonder why they look so sharp? That’s the beauty of Over Under Lacing. The alternating pattern creates a neat, symmetrical design. Unlike traditional lacing, where the laces bunch up or sit unevenly, this method keeps them lying flat.
I first tried this on my dress shoes. The difference was clear. The laces looked crisp and uniform, giving the shoes a polished, professional appearance. Whether you’re lacing up sneakers, boots, or formal shoes, this technique makes them look intentional and well-fitted.
Faster and Smoother Adjustments
Tired of struggling to tighten your laces evenly? I used to pull and tug, trying to get the right fit. Some sections felt too tight, while others stayed loose. No matter how much I adjusted, it never felt quite right.
With Over Under Lacing, the friction is reduced, making it easier to pull the laces tight. The alternating over-and-under pattern helps distribute pressure more evenly, so you get a snug fit without uncomfortable pinching. I noticed the biggest difference in my running shoes. Instead of stopping mid-run to fix loose laces, everything stayed in place from start to finish.
Longer-Lasting Laces and Shoes
Ever notice how your laces start fraying at certain points? That’s because traditional lacing creates repeated friction at the same spots. Over time, the lace fibers weaken, and you end up replacing them sooner than you’d like.
Over Under Lacing helps prevent that. By alternating the over-and-under pattern, the tension is spread out, reducing strain on both the laces and the shoe’s eyelets. This small change made a big difference for me. My favorite sneakers lasted months longer without that worn-down look.

Why Alternating Crossovers Matter
Laces wearing out too fast? Eyelets looking rough? That’s friction at work. Traditional lacing drags laces across the shoe’s edges, causing damage over time.
Over Under Lacing changes that. By alternating over and under, the laces glide more smoothly, reducing wear on both the laces and the shoe. I used to replace mine constantly—until I switched. Now, they last much longer.
Tightening is easier too. The over crossovers sit on top, making them easy to grab. Instead of pulling every section, you only need to tighten every second one. Less effort, same snug fit.
I noticed this first with my hiking boots. What used to take minutes now takes seconds—without sacrificing comfort. If you want laces that last and a faster way to lace up, this method is worth a try.
Conclusion
Lacing your shoes right makes all the difference. Over Under Lacing helps create even tension, reduces wear, and gives your shoes a cleaner look. No more pinching, slipping, or constant adjustments.
I used to struggle with loose laces and pressure points. Switching to this method changed that. Now, my shoes fit better, and my laces last longer.
Try it for yourself. Take a few minutes, lace up your favorite pair, and feel the difference.
Need more tips? Contact us today!
Quick Quote
Fill out the form, get the quote in hours!


